It's A Vibe! How I Created A Revision Studio Using Vibe Coding

Updated: Sep 23
I explain how I turned my teaching resources into a four-part revision studio in around 20 minutes.

This week, I used Canva Code to create interactive retrieval activities on the topic Protein for my AS-level Nutrition & Food Science students. I wanted short activities that I could use as lesson starters and revisit later, once we had moved on to another topic.
I created a tailored revision studio containing four different question types in just short of twenty minutes. It is a complete four-part resource that students can work through independently which could also be used as part of a teacher-led retrieval activity in class.
What appealed to me was the speed with which Canva Code turned my existing teaching content into something interactive but also aligned to the CCEA AS1 Nutrition & Food Science specification. I could describe the activity I wanted in ordinary language, test what it produced and then continue refining it through follow-up instructions. No knowledge of coding required!
What is Canva Code?
Canva Code allows you to describe an interactive activity in ordinary language and have AI generate the code behind it. You can then test the result and request changes through follow-up prompts, without writing the code yourself.
This is the sort of process often described as vibe coding: explaining what you want, trying the output and refining it through conversation with AI.
My school has signed up for Canva for Education and I access Canva Code through the Classroom area in my account. Canva also documents a route through Canva AI → Code on the homepage. From there, you describe the activity and submit your prompt.
Starting with my teaching sources
I uploaded the relevant section of the specification and content from the Protein PowerPoint I use in class. This gave Canva Code a focused starting point and helped align the questions to the CCEA specification section I wanted students to revise.
For an examination course, terminology matters. I wanted definitions and explanations that the students will be examined on, rather than a general quiz about protein that might introduce unfamiliar wording or material beyond the specification.
Providing sources helps guide and tailor the output. It does not guarantee that every question or explanation will be correct, so I still needed to carry out repair and maintenance of the finished activity against the original material.
Here is the prompt I used:
Generate a revision lesson set of activities for students to complete, including a multiple-choice quiz, true or false quiz, matching key terms to definitions and a short-answer quiz. Add plausible answers. Whenever students get an answer wrong, have an information box pop up to explain it. Provide an option for a hint to help students solve questions. Content covered should not include nitrogen balance or comparing the nutritional content of proteins.
The exclusions were deliberate. I wanted control over which parts of the topic appeared.
I kept the activities to 8–10 questions each. This made them manageable as short exercises and made quality control quicker. I could work through every question, answer, feedback box and button without the checking becoming a lengthy task.

Four ways to revisit the same knowledge
The revision studio brings four activity types together in one place.
Activity | What students can practice |
Multiple-choice questions | Distinguishing a correct answer from plausible ‘red herring’ alternatives. Carefully chosen incorrect options can expose misconceptions. |
True or false | Examining whether a statement is accurate. Asking students to correct false statements adds a useful follow-up. |
Key words and definitions | Connecting subject terminology with its meaning. Matching provides support before students attempt definitions independently. |
Short-answer exam-style questions | Recalling and expressing knowledge without a list of possible answers, and applying it where the question requires this. |
A student might recognise a correct definition but find it harder to write that definition from memory. Another might remember a term but struggle to use it accurately in an explanation. The different formats provide opportunities to explore those distinctions.
This approach also connects with Rosenshine’s Principles of Instruction, particularly reviewing previous learning, asking frequent questions and providing opportunities for practice. The different formats move students from more supported recognition tasks, such as matching and multiple-choice questions, towards less scaffolded recall through short-answer questions. The variety is not valuable simply for its own sake. It gives me different ways to check understanding, uncover misconceptions and revisit knowledge until recall becomes more secure.
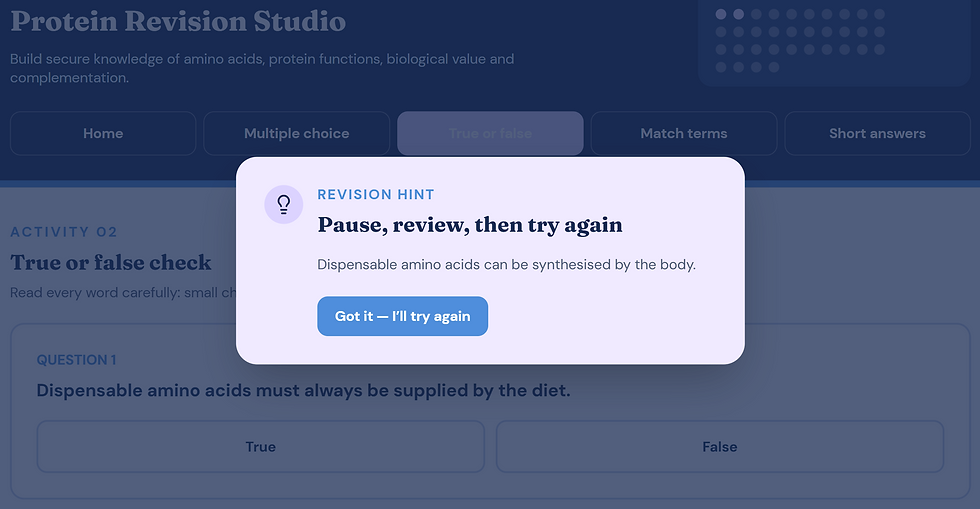
I requested an information box to be displayed after an incorrect answer. The intention was to give students an explanation they could learn from, rather than simply telling them they were wrong.
That feedback still needs teacher follow-up. Reading an explanation does not necessarily mean that a misconception has been resolved. Asking students to correct their answer or attempt a similar question later would help check whether their understanding had changed.
Repair and refine
The first version gave me a strong starting point, but it was not ready to use without checking. This is where some teacher-led refinement made a difference.
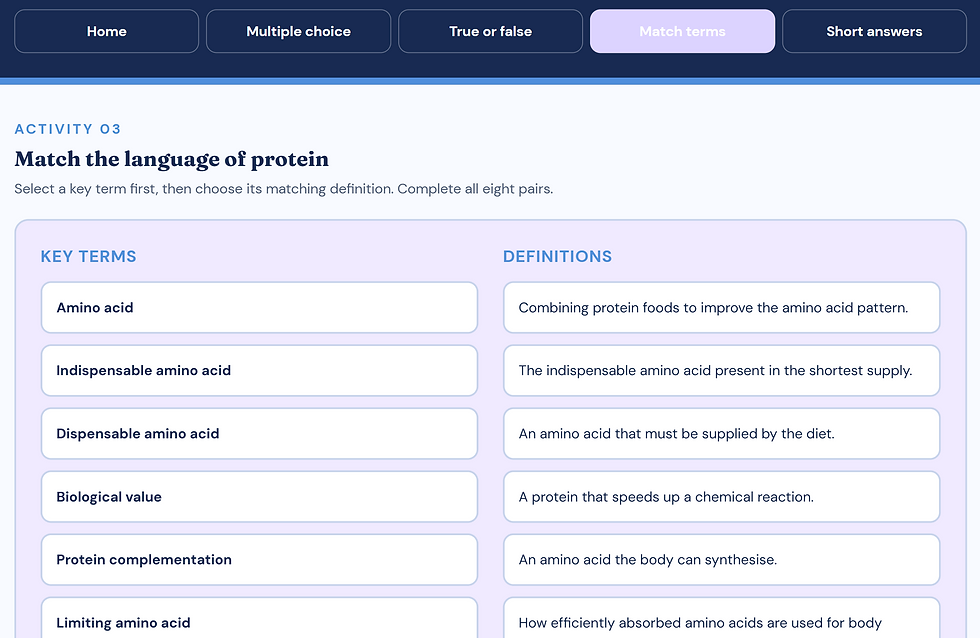
One recurring layout issue was the positioning of key words and definitions. Sometimes Canva Code placed all the words collectively in one box and the definitions underneath in a separate box. Students would have needed to scroll up and down to compare them.
I preferred two columns side by side, keeping both sets of information visible on the classroom devices. This is an instruction I can include in future prompts from the outset.
Another issue was that selected buttons did not always stand out. I added an instruction asking for a clearer visual indication of the selected answer. Students should be able to see what they have chosen without wondering whether their click has registered.
You can also specify a colour palette, font and overall style to keep activities consistent with your other subject resources or your own teacher style. Clear text, sensible spacing and straightforward navigation are worth specifying alongside the colours.
Canva saves a new version each time you request a change through prompting. Earlier versions remain accessible in the chat, allowing you to compare them or return to a previous version.
Before publishing, I play through the activity. I check the answers, deliberately choose incorrect responses to inspect the feedback, test the buttons and review the layout.
Short-answer questions deserve particular care. A correct response can be phrased in several ways, so it is worth checking whether valid alternatives are accepted. Where this is unreliable, a model answer and key points for students to compare with their own response may be more useful.
An AI-generated exam-style question is not an official examination question, and its feedback should not be treated as an official mark scheme.

Publishing and sharing with students
Once the activity is ready, it can be published as an interactive website.
Canva’s current direct-publishing process is:
Select Preview and test the activity.
Select Publish in the top-right corner of the Code window.
Check or customise the website address.
Open Settings to review the title, search-engine visibility and any password protection.
Select Continue to publish, then Publish.
Copy the live website link and share it through your usual classroom platform. I use OneNote.
The published link is also available in the original Code thread beside a Live badge. If you make further changes, publishing again from the same thread updates that link.
Use in a design is another route for incorporating the activity into a Canva design, rather than a required step for direct publishing.
Before using an activity in class, I would also test the published link on a school device to check access and how it displays.
You can explore my Protein Revision Studio here:
Retrieval practice and formative assessment
I can use these activities as short starters with students attempting the questions before looking at their notes or as an exit ticket at the end of class. Retrieving previously learned information can help strengthen later retention, rather than simply checking what students remember at that moment.
The studio gives me a resource to return to one or two months after teaching a topic. Revisiting the material after a gap would provide an opportunity for spaced retrieval. Students would not need to complete all four sections at once. A short selection followed by discussion and correction may suffice. You can also generate a single quiz format if that better suits your lesson.
My revision studio does not send students’ scores back to me. That limits my automatic overview, but it can still support formative assessment. For example, I could ask students which definitions they confused or which concepts they found difficult. A follow-up question on mini whiteboards would give me more direct evidence of their understanding. I could then clarify an explanation, revisit a misconception or plan further practice.
The formative value comes from using the responses to inform what happens next. The activity and its feedback provide a starting point for that conversation.
Reusing what worked
One useful feature is the history of my Canva Code activities. I can return to a previous chat, copy a prompt and adapt it for another topic.
The repairs also become part of that reusable prompt. Next time, I can specify side-by-side matching columns, clearly visible answer selections and the design choices I want from the beginning.
For teachers trying a similar approach, these additions could make the original prompt more precise:
Use the supplied sources to create a four-part revision studio for [YEAR GROUP/COURSE] on [TOPIC]. Include 8–10 questions in each section: multiple choice, true or false, key words and definitions, and short-answer exam-style questions.
Keep the content and terminology faithful to the sources. Exclude [CONTENT TO OMIT].
After an incorrect response, provide a brief explanation to help students understand the mistake. For short-answer questions, provide a model answer and key points for comparison.
Display matching terms and definitions in two side-by-side columns on larger screens, with a readable layout on smaller devices. Make selected answers clearly visible.
Use [COLOUR PALETTE], [FONT] and a clear, uncluttered style.
This is an improved version for future use, rather than the exact prompt that produced my original studio.
In under 20 minutes, I had a complete four-part resource, including the time spent checking and refining, as well as a prompt I can adapt again.
Canva Code can bring the vibes. The teacher still needs to bring the expertise and professional judgement.